Align Head & Calibrate Eye Tracker
If you are using a preset with head control or the preset: Eye Control only, it can be helpful to perform a head alignment or an eye tracker calibration.
If you are using the preset: Controller only, both are not relevant. You can skip this section.
With Align head, you can determine that Semanux Access should consider your current head position and rotation as the center point.
This section is only relevant if you are using a preset with head control. Otherwise, you can skip it.
- First, try to position yourself or your camera so that your head is visible in the center of the frame. Ideally, it should look something like this:

When looking for the ideal position for the camera, make sure that you keep your head in a comfortable position. From this position, you should be able to rotate your head up, down, left, and right. The camera or your head should not be positioned so that your head only appears at the edge of the frame. For example, it should not look like this:
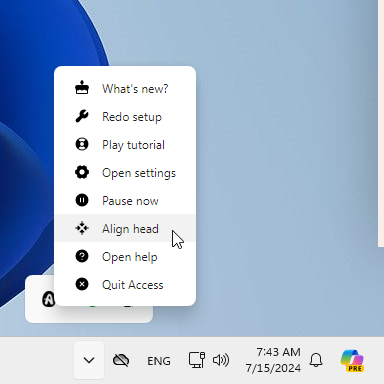
- Then click on the entry Align head in the context menu:
- The screen will briefly turn black, and the following message will appear in the center:
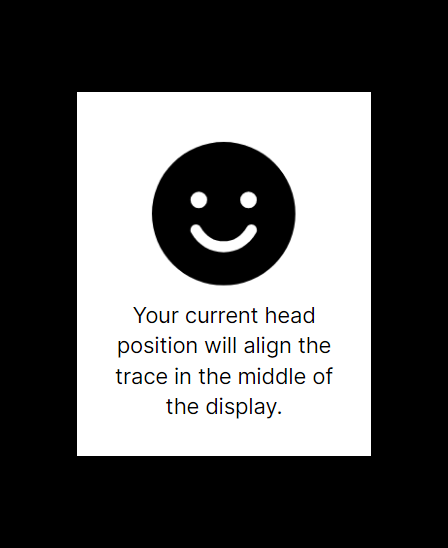
- Now hold your head as still as possible in the position that is a comfortable center for you, as you positioned the camera in the first step.Hint:
If you have trouble keeping your head still, it might be helpful to have someone assist you by holding your head briefly.
- After a few seconds, the message and the black background will disappear, and the head alignment is complete. Semanux Access has now remembered your head's central position.
- If it didn't work the first time, simply repeat the head alignment!
With Calibrate eye tracker, Semanux Access can work together with your eye tracker to learn where you are looking on the screen.
This section is only relevant if you are using the preset: Eye Control only. Otherwise, you can skip it.
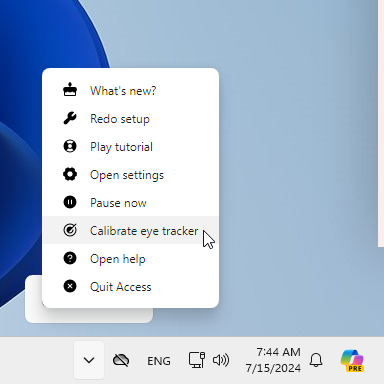
- Click on the entry Calibrate eye tracker in the context menu:
- Then try to position yourself or your eye tracker so that your eyes are visible in the center of the frame. Ideally, it should look something like this:

You can tell if your eyes are detected correctly by the colored circles above them. Adjust your head position until the circles turn green. If they are red, it means you are either not in the center of the frame or too close or too far from the eye tracker. For example, it should not look like this:
- Once you have found a good position, make sure not to move your head.Hint:
To get the best eye tracking results, it can be helpful to use a device that holds your head still. If you are lying in bed, using a few pillows can be a great help to keep your head from moving inadvertently.
- Click the button Recalibrate.
- The screen will turn black, and a small, colored dot will appear. Keep your gaze fixed on this dot. Try not to let your gaze wander.

After a few seconds, the dot will move to a new position. Keep your gaze fixed on the dot.
The number in the dot indicates how many more dot positions will follow. - When you are finished, the black background will disappear, and the calibration is complete. A message will appear with the calibration result:
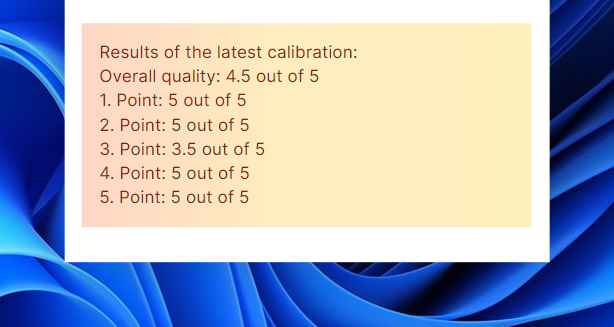
This message contains a rating from 1 to 5 points on how well the calibration worked – both overall and for each individual calibration point.
After a successful calibration, Semanux Access, together with your eye tracker, has learned where you are looking on the screen. - If it didn't work the first time or you moved your head after the calibration, repeat the calibration!
If Semanux Access has trouble detecting your eyes or gaze, the same window will automatically appear as if you had clicked on Calibrate eye tracker:
![]()
The Recalibrate button is very large, so you can hit it with your gaze even if the calibration didn't go well or if you moved your head inadvertently. Otherwise, you can press Close.
If you want to quickly start a new calibration but can't or don't want to use the mouse, you can simply keep your eyes closed for a few seconds. The window with the Recalibrate button will automatically appear.