Mouse Click, Scrolling, Drag-and-Drop & Magnifier Menu
So far, we have learned how to move the trace. But how can you now use it to control your computer and other programs?
Nowadays, most programs assume that you are actually using a mouse to control them. Therefore, Semanux Access works by pretending to the program that you are using a mouse.
With a mouse, there are different ways to click: a click with the left mouse button, a double click with the left mouse button, a click with the middle mouse button or on the mouse wheel, or a click with the right mouse button. Therefore, you can activate an action from the panel with the trace for these inputs:

Because Middle click and Right click are used less often, these actions are not in the panel by default. Instead, we recommend performing these actions with the magnifier menu, which we will explain shortly. However, if you want these actions to be available in the panel, you can add them (see: Settings: Panel).
A click works as follows:
- Activate one of the mouse click actions in the panel with the trace.
- Now you can move the trace to the location where you want to click.
- Hold the trace still at this location for a moment. The trace then turns into a larger circle that gets smaller and smaller:

The click is executed in the middle of this circle. From the size of the circle, you can tell how much time you have left to move the trace before the click is executed. If you move the trace, the circle disappears again. So to click, you just need to move the trace until it is over the spot where you want to click and then hold the trace still for a moment.Info:Holding the trace still at a specific spot? We know that already, right? Exactly! Here, we are clicking with dwell time. If the clicking process is too fast or too slow for you, you can adjust it as you wish (see Settings: Dwell Time).
- Before the click is executed, the selected screen area is "zoomed in" (it is displayed larger). This gives you an opportunity to refine the spot where the click will be executed. Again, with the shrinking circle, just as in the previous step.Info:
If you want, you can set how much magnification should be in the zoom level or whether you prefer to do without magnification altogether (see Settings: Mouse Click).
- Finally, the click you have chosen is executed at the spot you have determined.
After each click, a small animation appears to show you what type of click was executed where. For example, this is what it looks like with a left click:
- If you accidentally activated a click action, or if you decide during the clicking process that you no longer want to click, you can cancel it at any time.
During the clicking action, there is a Abort button at the spot where the panel is normally located: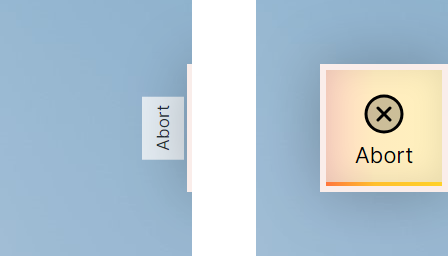
This is normally collapsed, like the panel (left image). Move the trace over the thin line at the edge of the screen to unfold the button (right image). Hold the trace over the button for a moment to cancel the click action.
Did you just try to perform a mouse click on an icon on your desktop with Semanux Access, but nothing happened? This is probably because you tried it with a Left click. On the desktop, however, you need a Double click! Just like with a regular mouse.
Activating the corresponding action in the panel for each mouse click is too slow for you? In the next section, we will show you how it goes faster with direct actions!
"Scrolling" means moving the current screen view up or down on a webpage or other document so that you can see further content that does not fit on the screen all at once. With a mouse, you typically scroll by turning the mouse wheel up or down.
With Semanux Access, you can scroll as follows:
- Activate the Scroll action in the panel with the trace:
- Determine the area of your screen where you want to scroll. This works similar to a mouse click: move the trace to the spot where you want to scroll and then hold the trace still for a moment. The trace turns into a larger circle that shrinks to the spot where scrolling will occur.
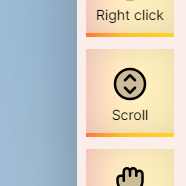
If you want to cancel scrolling, there is a Abort button at the spot where the panel normally is. Just like with a mouse click. - Now the scroll mode is active. A black dot appears at the spot where you started it. From this dot, you can move the trace either down or up to scroll down or up:
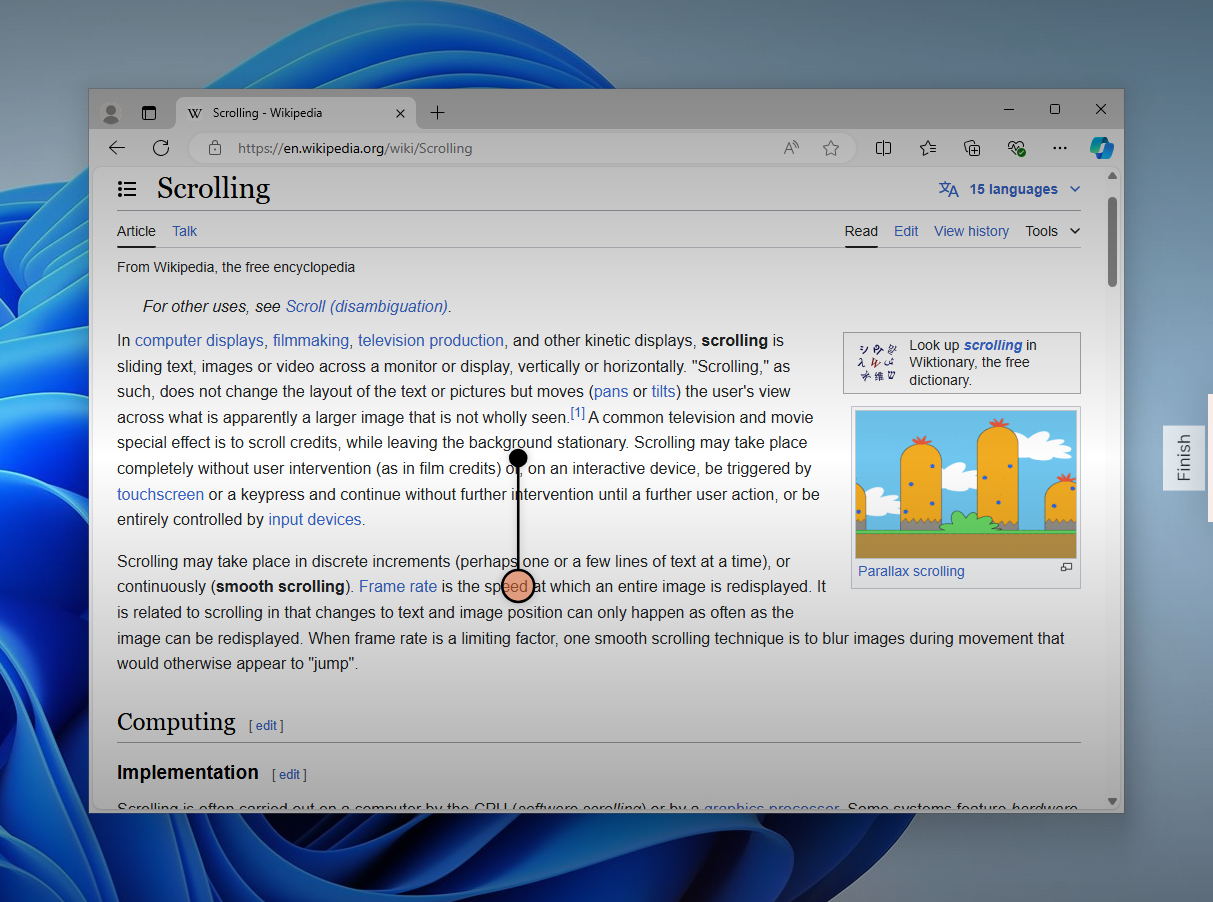
The further you move the trace away from the black dot, the faster it scrolls. - When you are done scrolling, use the Finish button located where the panel normally is (visible on the far right in the last image). It works just like the Abort button.
"Drag-and-Drop" refers to moving the mouse pointer while holding down the left mouse button. With this, you can move windows or files around, select multiple files at once with a lasso, or select text sections in documents.
Drag-and-Drop works in Semanux Access by first selecting a starting point and then a destination point. Semanux Access will automatically move the mouse pointer to the starting point, hold down the left mouse button for you, move the mouse pointer to the destination point, and then release the left mouse button. This is how it works:
- Activate the Drag and drop action in the panel with the trace:
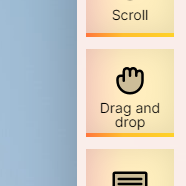
- Determine the starting point. This works similarly to a mouse click: move the trace to the spot where you want to scroll and then hold the trace still for a moment. The trace turns into a larger circle that shrinks down to a spot. Similar to a mouse click, a zoom view follows to allow you to select the spot more precisely.
The selected starting point is then visually marked:
If you want to cancel Drag-and-Drop, there is a Abort button at the spot where the panel normally is. Just like with a mouse click. - You can now determine the target point in the same way.
- Finally, Drag-and-Drop is performed from your chosen starting point to the chosen target point:
You can also move the mouse pointer without pressing any mouse button. Although this form of mouse input is only needed for a few programs, it is also possible with Semanux Access (see: Move Mouse Pointer).
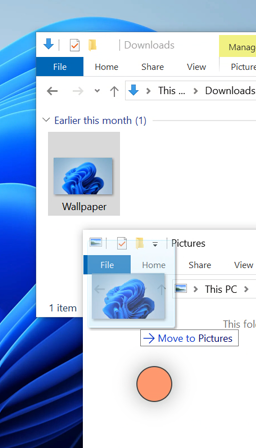
In some programs, you need to click on very small areas on your screen precisely. For cases where this doesn't work so well with the regular mouse click of Semanux Access, there is the magnifier menu. This is how it works:
- Activate the Magnifier menu action in the panel with the trace:
- Then select an approximate spot. This works similarly to a mouse click: move the trace to the spot you want for the magnifier menu and then hold the trace still for a moment. The trace turns into a larger circle that shrinks to a spot.
If you want to cancel the magnifier menu action, there is a Abort button at the spot where the panel normally is. Just like with a mouse click. - Instead of executing a mouse click, the magnifier menu appears:

The approximate spot you selected earlier is displayed enlarged in the zoom view in the middle. - In the very middle is a small white dot. This is the spot where you can perform some actions, such as a left click, in the following steps.
If the white dot isn't exactly where you want it, you can move it with the Up, Right, Down, and Left buttons. Move the trace over one of the buttons. As long as the trace is over one of the directional buttons, the white dot in the middle will move.
So you don't lose track of where you are on the screen, there is a complete view of your previous screen position at the bottom left of the magnifier menu. You can use this to orient yourself to know where the zoomed screen section in the middle is coming from. - When you have the white dot where you want it, you can execute a mouse click at that spot with Left click, Double click, or Right click.
Or you can open the virtual keyboard with Type, or move the mouse pointer with Move. More about this in the later basics sections. - If you decide not to perform any action at the spot with the white dot, or you accidentally opened the magnifier menu, you can close it with Abort.